Skip to Main Content

Tech Tools: Using PowerPoint

How to use different tools for assignments writing and presentations

PowerPoint

PowerPoint is a piece of software that has been developed by Microsoft to allow you to create slideshows for any presentation that you have to make. It enables you to present information in a visual, organised way using text, animation, transitions, images and embedded videos and audio files. This helps to engage your audience.

PowerPoint has many features which you will become more familiar with, the more you use it. Key things that are useful as a student are:

  • It is freely available through Microsoft 365
  • It enables you to create slide content quickly and easily
  • You can organise your slides, so they follow a logical sequence
  • You can add images that are relevant to what you are saying
  • You are able to transition seamlessly from one slide to the next
  • You can add animation to give the impression of text disappearing and re-appearing
  • You are able to add audio or a voice over if required

On this page

How to                                                                      Add                                                                                       Tips  

Get started with PowerPoint                                     Add a picture, shape and more                                              5 Ps of presentation skills 

Create a presentation                                               Add a slide                                                                             Tips for creating a good PowerPoint

Preview and present your PowerPoint                     Add a video 

Record your PowerPoint                                          Add and format text

Save your PowerPoint                                              Add animation

                                                                                 Add audio

                                                                                 Add references to your presentation

                                                                                 Add transitions

1. Get started with PowerPoint

  • If you are using the desktop version, click the Microsoft tab on the bottom left of the page 
  • If you are using the online version of Microsoft 365, click the app launcher (Dots in a square) and select PowerPoint 

3. Add a slide

  • In the Home tab, go to the Slide section and select New Slide
  • Choose an office theme from the menu 
  • To add more slides to your presentation, click New Slide and select another slide, or put your cursor in the left pane and right click your mouse to add or reuse a slide

5. Add a picture, shape and more

Go to the Insert tab.

To add a picture

  • In the Images section found in the top ribbon, click the down arrow under Pictures
  • In the Insert Picture From box, select the source you want
  • Choose where you want to get the picture from, select it, then click the Insert button
  • Change the way it displays using the suggestions under Designer on the right if you wish

To add illustrations

  • In the Illustrations section found in the top ribbon, select Shapes, Icons, 3D ModelsSmartArt, or Chart.
  • In the pop-up box that opens when you click one of the illustration types, select the item you want and follow the prompts to insert it.

7. Add animation

Animation refers to visual effects that you can apply to pictures and text on your slide.

To animate text or images on a slide:

  • Select the text or image you want to animate 
  • Click the Animations tab, select the animation from the top ribbon or select Add Animation and select an animation from the drop-down menu (This includes enter, emphasis and exit effects)
  • Select Effect Options to change the effect i.e. direction, sequence etc.

To animate one line of text at a time

  • Select one line of text, select an animation, select the next line of text, select an animation, ..

Order and timing

  • Go to the Timing section and select when you want the animation to start i.e. On Click, With Previous, or After Previous
  • Or click Animation Pane. It will display on the right. Adjust the order, effect or timing
  • Click Preview on the top left of the ribbon or the  icon on the bottom right to preview and adjust animation 
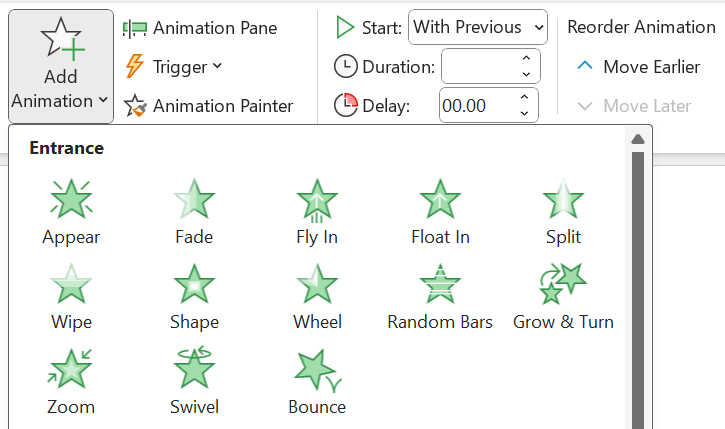
 

9. Add audio

Recording audio

  • Select the Insert tab on the ribbon, then click the down arrow under Media (to the right)
  • Click the arrow under Audio
  • Click Record Audio
  • In the pop-up box, name your recording
  • Click the red record button to tape your information
  • Click the square box to stop recording
  • Click the Green arrow to preview your recording
  • Click OK to save

Adding audio from your own device 

  • Select the Insert tab on the ribbon, then click the down arrow under Media (to the right)
  • Click the arrow under Audio
  • Click Audio on My PC
  • Select the audio you want to add
  • Click Insert

Playing audio

  • The Animation Pane will open on the right
  • Adjust when the recording starts, its timing etc. by clicking the down arrow next to the audio name  
  • Click the speaker icon on the slide to play

11. Add references to your presentation

If you have used information that has come from someone else (an author's ideas, words, research findings or a figure such as an image, table, graph etc.), you need to reference it

In-text citations

  • Include an in-text citation in a similar way to a written assignment e.g. 
    • Positive interpersonal interactions are crucial for building trust and rapport (Penney et al., 2024)

Reference list

  • The reference list is on a separate slide at the end of your presentation
  • The Word References is bold and centred in the middle of the slide
  • The list is arranged alphabetically with the first line of an entry against the left margin and the rest of the reference indented 
  • APA states you need to use double spacing for your reference list. For display purposes, check with your tutor what spacing they would prefer for your presentation
  • Provide the full details for each cited source
  • Only include sources cited in your presentation

Figures i.e. images, pictures, charts and graphs etc.

For information on how to reference figures in PowerPoint presentations, see the APA Referencing guide Figures - In PowerPoint Presentations

12. Preview and present your PowerPoint

Different ways to Present your PowerPoint 

  • Click the Slide Show tab. Select From Beginning or From Current Slide in the ribbon at the top 
  • Use the F5 key on the keyboard (To start from the beginning)
  • Click the icon at the bottom of PowerPoint  (To start from the current slide)

Other tips

  • Hit the Windows key and the letter P on the keyboard to show display options (PC Screen only, Duplicate, Extend, Second Screen only)
  • Hide or unhide slides by either using the icon in the top ribbon under Slide Show or by clicking on the relevant slide in the left pane, then right clicking your mouse and selecting Hide Slide from the drop-down menu
  • Click Esc on the keyboard to exit your Slide Show presentation

Go to the Help tab -and click Show training for more information

Tips for creating a good PowerPoint

  • Select a suitable template for your topic or create your own
  • Keep it simple. Don’t feel that you have to fill the whole slide with words and pictures.
  • Text should be short and to the point and include only key words and phrases
  • Use bullet points to cover each idea
  • Use the Notes field at the bottom of the slide to add extra information
  • Headings, subheadings, and logos should show up in the same spot on each frame
  • Margins, fonts, font size, and colours should be consistent with graphics located in the same general position on each frame
  • Lines, boxes, borders, and open space should be consistent throughout
  • Font size should be readable and the same throughout. Recommended fonts are Arial, Tahoma, Veranda. The larger the better so it can be read from the back of the room e.g.

Veranda 40

  • No text should be smaller than font size 24
  • Use a set font and colour scheme otherwise it can be distracting to your audience. You want the audience to focus on what you present, not the way you present. 

Don't sacrifice readability for style

Don't sacrifice readability for style

Don't sacrifice readability for style

  • Use high quality graphics or pictures. Avoid clipart
  • Limit animation. Use the same animation throughout and /or no more than 2-3 different types for your entire presentation. Otherwise, it could be distracting
  • Use appropriate graphs and charts and make sure the audience can read them

2. Create a presentation

  • Open PowerPoint
  • On the left, select New
  • Select an option
    • To start from scratch, select Blank Presentation
    • To use a template, select or search for a design 


  • Once in PowerPoint, look at the ribbon across the top of the page to see the different tabs available i.e., Insert, Draw, Design, Transitions, Animations, Slide Show, Record, Review, View, Help, Acrobat
  • Click through each of the tabs to see what commands each contain

4. Add and format text

  • Place the cursor inside an existing text box and type your text 
  • If you are using a blank slide and want to add a text box, click the Insert tab, select Text Box in the ribbon, then click your cursor on the slide and type
  • To change the text, highlight it, then select one or more options from the Font section of the Home tab, such as Font, Font Size, Bold, Italic, Underline, etc.
  • To create bulleted or numbered lists, select the text, and then select Bullets or Numbering from the Paragraph section

6. Add transitions

To transition from one slide to another:

  • Select the slide you want to add a transition to
  • On the transitions tab, select the effect you want (Click the down arrow to see more option)
  • Click Effect Options to choose a direction 
  • The Timing section allows you to transition on a Mouse Click or after a set time. You can apply this to all slides if you wish

To undo a transition

  • Select None in the top ribbon

8. Add a video

Inserting a video from YouTube or another site

  • In your web browser (MS Edge, Safari, Google Chrome etc.) locate the video you want
  • Copy the URL of the web page from the Address bar of your browser (https://www...)
  • Switch back to PowerPoint and select the slide where you want to place the video
  • Select the Insert tab on the ribbon, then click the down arrow under Media (to the right) then the arrow under Video
  • In the Insert Video From box, Click Online Video
  • Paste the URL you copied in step 2
  • Click Insert

Inserting a video from your own device or a stock video

  • Select the Insert tab on the ribbon, then click the down arrow under Media (to the right) then the arrow under Video
  • In the Insert Video From box, Click This Device or Stock Videos
  • Select the video
  • Click Insert

To embed a video behind text on a slide

  • Copy the URL of the video
  • Highlight the text you want to embed the video behind 
  • Ctrl K to open the insert hyperlink box
  • Ctrl V to paste the URL into the address box
  • Ok

10. Record your PowerPoint

You can play your presentation in Slide Show, or you can export it as a video file.

  • Click the Record tab in the top ribbon
  • Click From Beginning
  • When you're ready, select the round, red Record button, wait for the countdown, then start speaking
  • To record from a specific slide, click From Current Slide then select the red Record button
  • You can also click the Record button at the top right

Manage narration and timings

There are different ways to manage recordings in your presentation:

  • Pause - to pause a recording
  • Stop - to end a recording
  • Replay - to replay a recording
  • PenHighlighter, or Eraser - use the pen, highlighter, or eraser tools to mark up your recording

Remove narration or timings

An audio icon appears on a slide when narration is available. You can also remove narration or timings from your slide.

  • If you're in record mode, select Clear.
  • Choose from two options:
    • Clear Recording on Current Slide - to delete narration and timings on the current slide

    • Clear Recording on All Slides - to delete narration and timings from all slides at once

Viewing your notes

  • On the right bottom of the recording screen, click Views to see viewing options in a drop-down menu
  • Teleprompter view. This shows your notes from the current slide above the slide preview. This allows you to read your notes while maintaining eye contact with the audience in the recorded video
  • Presenter view.  This shows your notes for the current slide and the next animation or slide in a side panel on the right. 

Preview your recording

  • Click Preview to review your recording
  • Click Edit on the top left to go back to your PowerPoint and apply any changes

Save a recording

When you're done recording, save and share your presentation as a PowerPoint file or video.

  • Select File
  • Choose an option like Save or Export

Your recording will automatically play when someone opens the presentation.

Tips

  • Narration isn't recorded while the transition between slides happens, so pause during a transition, then resume speaking
  • Select Help in the top right for more information

13. Save your presentation

Save to OneDrive

  • Click File in the top left
  • Select Save As
  • Click OneDrive Whitireia and WelTec

Save to your personal device

  • Click File in the top left
  • Select Save As
  • Double click This PC
  • Give it a file name, select a folder
  • Click Save

5 Ps of Presentation Skills

1. Plan - Why, Where, When, Who, What, How

  • Why are your presenting? What is the purpose, a class assessment or presentation
  • Where are you presenting? In class or via Zoom
  • When are you presenting? Make sure you have the date and time correct
  • Who are you presenting to? Know your audience. Is it your tutor and/or your peers. What are their needs and expectations?
  • What are you presenting? What is your content. Structure your presentation in a logical and engaging way. Define your key points, make it clear and organise it well with an introduction, body and conclusion (similar to a written assignment)
  • How will you present? What images will you use. Think about your own 'voice' being included in your work

2. Prepare - Putting your presentation together

  • Research your content and gather your information
  • Create the slides. Think about the title
  • Add text. No more than 5-6 'must know' statements on each slide (bullet points, keywords or brief statements). Add any visuals or animation
  • Don't read from the slides, place any description of content in the notes field
  • Any information from someone else needs to be backed up with an in-text citation and a corresponding reference

3. Practice - Practice, Practice, Practice

  • It is important to practice so you can present a polished, confident presentation
  • Write a script similar to an assignment and then reduce it to cards
  • Rehearse it out loud, standing up
  • Practice it in front of family and friends and ask for honest feedback
  • Think about your delivery i.e. your tone, the way you stand and move, your pace and pauses, the volume of your voice

4. Performance - The presentation 

  • Count to 5 before you start
  • Speak clearly and confidently
  • Engage with your audience by using eye contact 
  • Think about your audience and how you will respond to their reactions and questions. Listen to their entire question. Repeat the question. Respond to the question honestly and to the best of your ability. If you don't know the answer do not try to fake it

5. Presence - Connecting with your audience

  • Think about the way you present yourself, remember this is a visual presentation
  •  Be professional
  • Analyse any feedback for next time

[Adapted from The Presenter Studio]

Contact Us

If you have any questions, you can talk to us by:

phone at 0800 141121

email at lss@wandw.ac.nz, or

visit one of our campus libraries